Subversive Sewer


{August 19, 2010}   I’m back!

Sorry about the long absence.  Life handed me a little bit of the unexpected.  If you’re a regular reader, you know that I’ve been trying to buy one house or another for months.  Well, yet another one didn’t work out, but I took it as a sign to wait till next year and buy in a neighboring county that I like a lot better than the one I live in now.  I’ve also given up some of my available sewing time (weekends) because, after 2 1/2 years of singledom, I met a really great guy.  It’s still pretty new- about 5 weeks- but it’s going surprisingly well.  He lives an hour away, so I’ve been staying at his apartment all weekend while our respective kids are with their other parents.

Now it’s time to show you what I’ve sewn during my absence:

New Look 6969, view D:

Here’s the envelope pic:

I finished this one today, and boy did I need a skirt!  I’m between the 2 sizes in my closet, so not much is fitting right now.  This is cotton twill, which I bought to make a trench coat, but since I still haven’t solved my fitting problems, I decided to use this fabric for stuff I can wear now instead.  (I’m not a stasher.)  Despite my nervousness, putting in an invisible zipper is apparently like riding a bike; you don’t forget how.  I used that Waist-Former waistband interfacing stuff for the first time, and I love the results.  This thing actually looks professional!  I didn’t feel like setting up my camera and the timer, so you get a crappy camera phone in the mirror pic.  🙂  Cost: $9

Next up is Butterick 5495.  I think I picked the wrong fabric.  It sticks out like a maternity top, but I think it’d lay flat just fine if it was a drapier fabric.  I like it enough that I’ll try it again.  Cost: $10   Any ideas on how to salvage this?

And here’s the envelope pic:

Last month, I decided to make another swimsuit!  This one I didn’t morph into something completely different like last time.  This time I used Kwik Sew, 3696:

I’m probably going to wear this this weekend, so if I do, I’ll get a pic of me wearing it, since this isn’t the best pic.  Once again, it was insanely easy to make.  After I finished it and tried it on, I became convinced that the swimwear industry is just one big racket.  This thing cost about $10 to make, people!  And I’m thinking it was about 2 hours to make, start to finish.  And it actually fits me!  I cut a small on top and the bottom was a medium and back to small at the hips, if I remember correctly.  One warning- if you’re busty, the girls are gonna be a focal point when you’re wearing this!!  cost: $15

And the envelope pic:

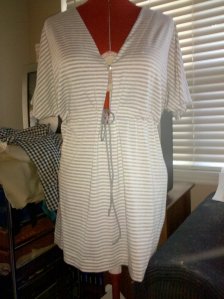
Finally, here’s a dress I made awhile ago, just never got around to getting a picture of.  This pic is horrible, so hopefully next time I wear this I’ll remember to get a decent picture for you.  This is McCall’s 6118:

Cost: $11.  I also made the zipper flower pin that you can barely see.  Here’s the pattern pic:

Well, that’s it for now!  Not sure what I’ll be making up next.  I ordered several cuts of that rayon/Lycra that was on sale recently at Fabric.com, so I might make something from that.


{June 23, 2010}   Catching Up

I just haven’t felt like sewing lately.  I certainly have felt like buying fabric and patterns, just not sewing!  This will be a mishmash of stuff to try and catch up.

Today I made a case for my new phone.  McCall’s 6091 had one that matched the dimensions of my phone (Droid) perfectly!

And here’s the pattern:

Look it’s our friend Natasha again!

Overall, it’s a success.  However, I wish I would have remembered to fussy-cut the front to get more of the print.  The flap is not perfectly symmetrical, but not enough to bother me too much.

Changes:  instead of that fleece they always tell you to use on bags that’s a bitch to work with, I decided to use pieces of craft foam cut to fit the front and back only.  The idea is that if I drop it (again), it might cushion the fall.  Let’s hope I don’t have to find out if I’m right!  I also added the clip, attached with grosgrain ribbon.  This way I can clip it to my bag so I don’t have to hunt inside my bag to answer my phone before it goes to voicemail.  The final change was to use regular ol’ cotton for the outside and a twill for the lining, which is opposite of what they instruct.  I had actually bought some home dec weight fabric for this, and I bought the fabric you see here at the same time because I just loved it that much and wanted to get my money’s worth on shipping charges.  After looking at both pieces, I decided the home dec print was too large, so I used this one instead.  I had some hot pink twill that worked perfectly for the lining too.  The home dec print will become a pillow, most likely.

Here’s one of many projects that I’ve done that hadn’t been photographed yet:

This is the Hot Patterns Peachy Beachy Cover-up, a free download from fabric.com.  You may recognize the fabric from this post.  It’s the last of my 4 yards of cotton knit I picked up in Miami.  It’s thin so it works great as a beach cover-up.  I did get to wear it, and it was great.  Just the right length, too!  If I recall, I did not make any changes to the construction.

McCall’s released their Fall 2010 patterns today.  If you haven’t seen them yet, don’t waste your time.  Every last one of them sucks.  Most of them are a rehash of the rest of the bad 80s trends they hadn’t revived yet.

Next up, I think I’ll work on  knit top I cut out a couple weekends ago, and either swimsuits, jeans or underwear.  We’ll see where my mood takes me.


Well, the swimsuit odyssey has come to an end, but many more odysseys are on the horizon, my friends.  Despite picking a very complicated project (by my standards), I thoroughly enjoyed the process and the result.  There a couple RTW suits I want to copy and maybe I can come up with my own designs as well.

One more shot of  the process and then I will show you the result.

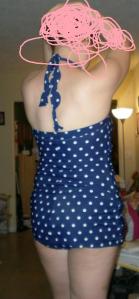
I know it’s hard to tell, but this is the upper edge of the suit, before the strap was attached.  You’ll notice that I placed the elastic right at the edge in places as instructed, but in the back and sides I placed it a little below the edge.  This was so I could attach the strap, which I modified.  (Notice how I’m not calling this a tutorial, since I suck at explaining this and lack adequate illustrative photos!)  That crappy BurdaStyle Alison suit had the strap style I used, and in fact, I cut a longer version of their pattern piece for this.  However, they wanted you to stitch the whole thing RS together and then attach it to the suit, creating a shitload of bulk and likely an ugly result.  Instead, I did the logical thing and marked on the suit and strap with a snip where the strap was no longer attached to the suit and those ends were stitched RS together.  The rest was basted WS together at the edge, then attached to the back and sides of the suit.  Hopefully you can see it if you click on the photo below of the back.

Well, here you go!  You can see that I suck at photo editing, but it got the job done.  I don’t want my pics stolen by some perv and used on a dating site or something.

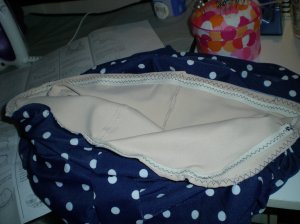
Ironically, I started exercising a few days ago, so hopefully I’ll be able to make a suit without ruching over the belly area soon.  Overall, I’m really happy with the way this turned out.  Sure, it’s not perfect (the inside ain’t so hot, and there probably isn’t enough bust support), but as a first suit for myself, and my second suit ever, I’m very pleased with myself.  I plan to wear this to my office beach party next month!  (hey, it’s Florida, you know!)

And, as always, if you see something that’s off, or you don’t like it altogether, I honestly appreciate those comments too.


{May 20, 2010}   Swimsuit Odyssey, Part 4

Well, I’ve been working on this swimsuit every night this week.  I  had to stop early tonight because I ran out of navy thread!

So far, I  have the lining assembled, the skirt finished and the bust attached.  The skirt was a unique experience.  I knew I wanted a lot of ruching but was unsure how long a piece I needed to get the amount I wanted.  I guessed wrong, but I was using my muslin fabric so it was OK.  It did give me a ratio to start with.  I ruched a 28″ piece to 10″ but it needed to be 21″ long ruched.  I knew there was a ratio involved, but math is not my strength.  Luckily, my cousin was home (did I mention he lives with us now), and being a law school graduate and all-around genius, I knew he could help me.  We soon realized that 8th grade math was a LONG time ago, because he sat there staring at the numbers on the dry erase board, laughing.  I knew we had to solve for X and thought maybe there should be some cross-multiplying involved.  Andy wasn’t sure, so he did some complicated stuff, and we came up with the same answer: 58″!

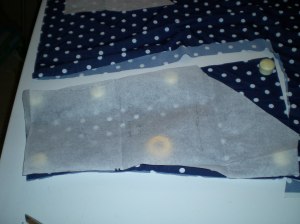
This was a really long piece- about 5′ long!  I used the lining piece as a guide for the width of the front skirt, using the narrower top for the first 1/3 of the ruched front, and the wider bottom for the rest:

The center back seam was curved, so I had to keep it for the back skirt.  I had moderate success with matching the print.  Again, I used the lining piece as a guide.

I’ve got all that sewn together.  However, when I attached the bust piece to the front, I realized that its sides needed to be attached to the back.  So, I had to rip out a bit of the skirt front, remove it, and attach the bust pieces to that and the sides.  Hope that was clear.

So, after I buy more thread, I’ll attach the back band/strap combo, finish the bottoms (attached to the lining), add some elastic, and attach the lining to the main suit.  Hopefully it’ll all turn out!


Peachy Beachy Coverup – Discount Designer Fabric – Fabric.com.

Yep, I spent a half hour looking for coverup patterns, and look what was in my inbox!!!  Thanks, Hot Patterns and Fabric.com!

I made great progress on my swimsuit and took some pics.  I’ll post more tomorrow!


{May 18, 2010}   Swimsuit Odyssey, Part 3

I’m still on my mission to get a flattering swimsuit for the office beach party on June 4!  Today I stopped at Hancock Fabrics to buy Kwik Sew 2690:

As I mentioned yesterday, I would never wear this suit as is.  But I felt that it was a good base to start with.  I never would’ve figured out how to have a skirt attached to a one-piece on my own.  And the bodice seemed to be what I was looking for.

I managed to get quite a bit done tonight.  I traced the pattern and cut the lining pieces.  I sewed them together to try on the suit and check the fit.  I traced a large at the waist and a medium everywhere else.  This seems to be right.  (I can’t bring myself to post a pic of me wearing a swimsuit lining muslin; I’m sure you understand why!)  I decided I didn’t like the look of the straps as is.  I borrowed an idea I saw in several of the suits I liked and cut a long band which was attached to the back upper edge and side front and extended into halter ties.   I like this look quite a bit.   Here’s a picture of the suit with the practice band/tie:

Not my best photography work; sorry about that.

Hopefully I’ll be able to work on the suit tomorrow.  In preparation, I measured the front and cut a piece of powernet in an attempt to compact my belly fat.  I’ll add that and see how it works.  I will also cut the bottom pieces (they get sewn to the bottom of the lining and treated as one piece, so I have to rip out the crotch seam and part of the side seams), the bust, tie and band/tie in my fashion fabric.  I will also need to draft the ruched “skirt” piece.  I think I know how I’m going to execute that.

If you have any suggestions or observations, I’d love to hear them!  This is pretty new for me, but it is as easy as I’d heard it was!


{May 17, 2010}   Swimsuit Odyssey, part 2

Well, forget the Alison swimsuit pattern.  What a piece of crap.  Between the vague (that’s being generous) instructions, the one illustration being a photo of black fabric, their disregard for finishing the leg openings, lack of markings (even when they claimed they were there), and all around poor drafting, that suit was a waste of time.  I’ll go buy a Kwik Sew pattern.   At least I’ll be getting a quality product.  I think I’m going to buy this one and modify it:

This is Kwik Sew 2690.  As is, I’d never wear this, but I’m buying it because it has the skirt part attached to the bottom, so I wouldn’t have to do a tankini and have to pull the top down all the time to keep it from exposing my gut.  Also, the bodice of the blue version is almost exactly what I want, just as a halter.  I’m thinking I should be able to replace the a-line skirt with a fitted, ruched skirt.  I’ll be covered up without looking matronly!


After making a swimsuit for my 6 year old daughter, I decided that it indeed was easy enough to make one for myself.  Being a person with some extra baggage (read: desserts) around my waist, I decided I need a one-piece.  I’ve chosen to make a retro style swimsuit with a halter and ruched skirt.  Here are some examples I’m using as inspiration:

(L-R: Kenneth Cole, top $66, bottom $54, Dillards.com, Jantzen, $98, Dillards.com, Jantzen, $120, Dillards.com, Curvallure by Jantzen, $110, Dillards.com, Mod Cloth, $89, modcloth.com)

So you see what I’m going for.  I think it’s going to be easier to go the tankini route like the Kenneth Cole one.  The fabric I’m using is just like the Mod Cloth suit but in navy.  I also have some powernet, which I’d like to try using for tummy flattening purposes.  I downloaded the Allison swimsuit from Burdastyle.com, but i can’t find the instructions, and the reviews aren’t great.  So, I think I’ll go the Kwik Sew route and adapt.  My deadline is June 4, when our office is having an “employee appreciation” beach party.  Any suggestions?


et cetera